Exploring background removal tools and features


TL;DR
- Evolution of background removal from manual paths to AI automation
- Importance of clean backgrounds for e-commerce conversion and marketplace compliance
- Strategies for recycling visual assets across different marketing campaigns
- Distinguishing professional-grade cutouts from amateur-level automated results
- Impact of high-quality imagery on user trust and brand perception
If you’ve been in the design game for more than a decade, you remember the struggle. You remember the hours spent with the Photoshop Pen Tool, zoomed in to 400%, clicking point-by-point to trace the frizz on a model’s hair. It was a pixel-perfect grind. It was tedious. And frankly? It was a waste of creative energy.
Those days are effectively dead.
What used to take a skilled retoucher twenty minutes now happens in a single click. Thanks to massive leaps in computer vision, background removal has shifted from a manual craft to an automated commodity. But here is the catch: just because the technology is accessible doesn't mean it’s perfect.
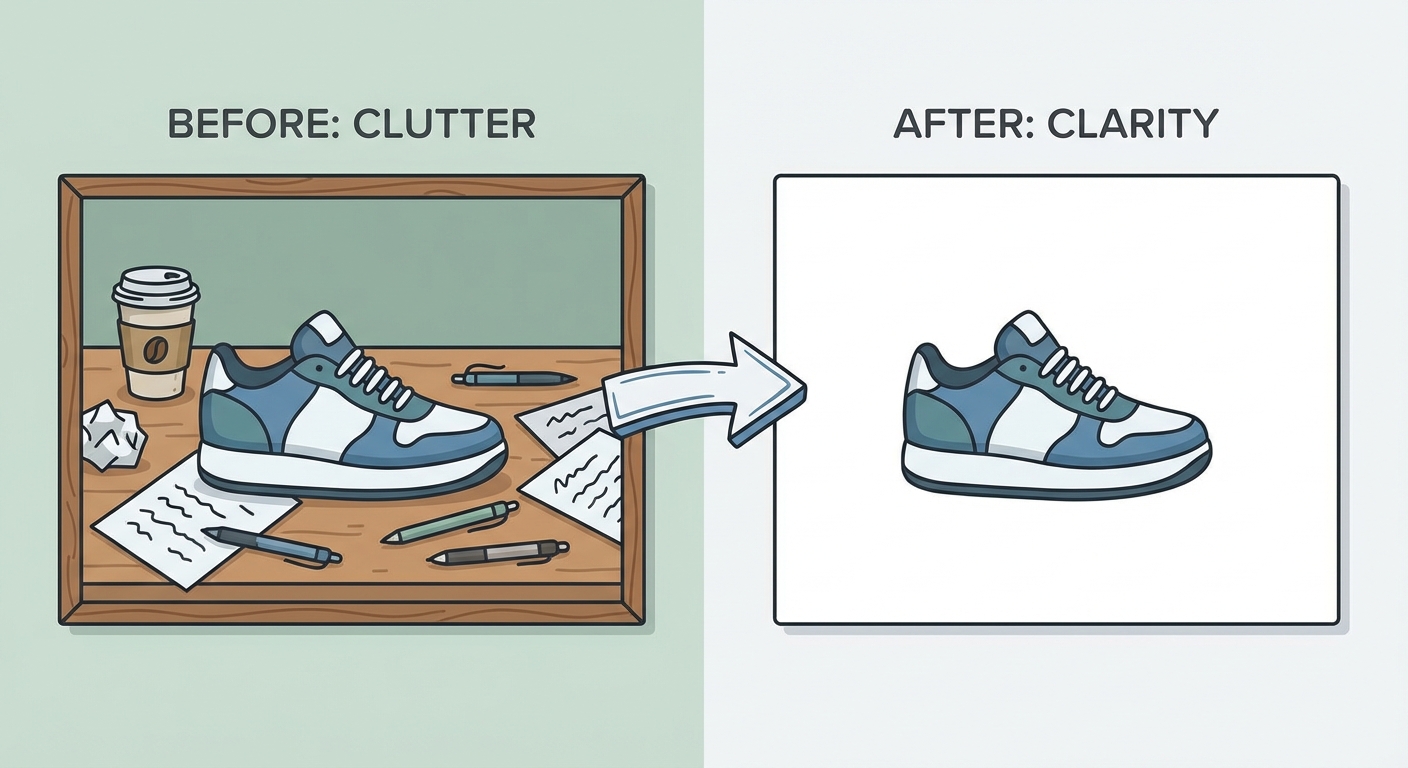
Deleting a background is easy. Doing it well—keeping the edges sharp, maintaining high resolution, and ensuring the lighting makes sense on a new backdrop—is a completely different beast. It’s the difference between a professional product shot and a cheap-looking cutout that screams "amateur."
This guide isn't just about deleting pixels. We’re going to tear down the tech, analyze the tools that separate the toys from the enterprise-grade software, and show you how to leverage this tech to scale your workflow without sacrificing quality.
Why Has Background Removal Become Critical for Digital Marketing?
Let’s be real: nobody visits an online store to admire the table your product was sitting on.
If you run an e-commerce brand, the "pure white background" (Hex #FFFFFF) isn't just an aesthetic preference; it’s the law of the land. Marketplaces like Amazon and eBay mandate it. Why? Because clutter kills conversion. When a potential customer scrolls through a listing, their brain makes a split-second decision based on visual trust. If the image is noisy, dark, or cluttered, the perceived value of the product drops.
But the utility of background removal goes way beyond marketplace compliance. It is the secret weapon of visual consistency and budget management.
Think about it. A brand rarely has the budget to reshoot their entire inventory every time a new season drops. By cleanly stripping the original background, you unlock infinite recycling potential. You can take that same sneaker you shot in a studio and drop it into a summer beach scene, a gritty urban layout, or a festive holiday banner—all without picking up a camera.
This flexibility directly impacts your bottom line. Clean, distraction-free visuals are proven to increase engagement. When a user can see the stitching on a wallet or the texture of a moisturizer without visual noise, they click. It’s that simple.
For a deeper dive into how image quality affects your search rankings (because yes, Google watches that too), check out our guide on optimizing product images for SEO.
How Does AI Background Removal Actually Work?
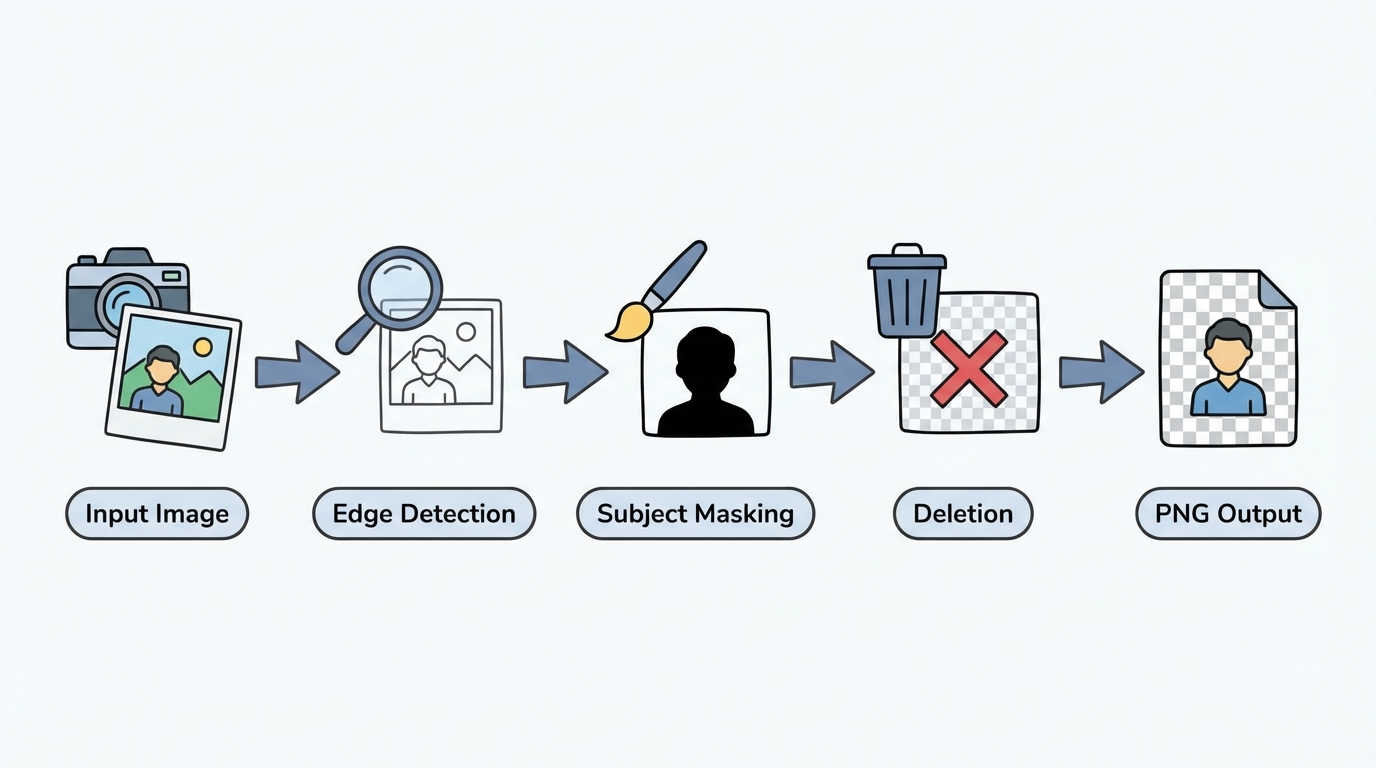
To the average user, it looks like magic. You upload a JPEG, wait three seconds, and poof—the background is gone. But under the hood, a violent amount of math is happening.
The software doesn't "see" a person or a car the way you do. It doesn't know what a "shoe" is. Instead, it analyzes millions of pixels to identify patterns in contrast, color, and depth. This process is called Semantic Segmentation.
In the early days, this tech was clumsy. It looked for hard lines. If you had a white shirt against a white wall? Good luck. The algorithm would panic and chop your torso in half. It would leave jagged, halo-like artifacts around the subject that looked terrible.
Modern algorithms are different. They have been trained on datasets containing millions of images. They’ve "learned" what a human looks like, what a car looks like, and crucially, how edges behave. They know that the edge of a smartphone is hard and sharp, while the edge of a fluffy cat is soft and semi-transparent.
When you click "Remove Background," the AI creates a binary mask: black for the background, white for the subject. But the magic happens in the gray areas—the semi-transparent pixels at the edge of hair or glass. That’s where the high-end tools earn their paycheck.
What Are the Top Background Removal Tools on the Market?
Asking "what is the best background remover" is like asking "what is the best car?" It depends. Are you commuting to work, or hauling lumber?
A social media manager needing a quick meme edit has totally different needs than a catalog manager processing 5,000 SKUs for a fall collection. Let’s break it down by workflow.
1. The Speed Demons (Best for Quick Web-Based Edits)
If speed is your god and you hate installing software, browser-based tools are the answer. Remove.bg and Photoroom are the heavyweights here.
They excel at "drag-and-drop" simplicity. You navigate to the site, drop your image, and download the result. No login, no friction.
Tools like Remove.bg are particularly terrifyingly good at handling human subjects. They manage hair strands better than most humans can manually. The trade-off? Resolution. Most free versions will cap your download size. Great for Instagram Stories, terrible for a billboard.
2. The Ecosystem Players (Best for Design & Branding)
If you need to use that cutout immediately—say, putting it on a flyer or a YouTube thumbnail—standalone tools are annoying. You don't want to download a PNG just to re-upload it somewhere else.
This is where Canva and Adobe Express dominate.
With Adobe Express features, background removal isn't the end goal; it’s step one. You strip the background, and instantly you’re in an editor where you can add typography, apply brand filters, or layer the cutout over stock video. It streamlines the workflow from "editing" to "publishing."
3. The Heavy Lifters (Best for High-Volume E-commerce)
When you have a warehouse full of inventory and a deadline on Friday, doing images one by one is suicide. You need batch processing.
Tools like Clipping Magic or dedicated Photoshop Actions are built for the grind. They allow you to upload folders containing hundreds of images, apply a consistent cut, and export them all simultaneously. These tools often offer "clipping paths"—vector-based outlines that print shops love because they are infinitely scalable.
Key Features to Look for When Choosing a Tool
Not all algorithms are created equal. Before you commit your credit card to a subscription, you need to stress-test the software. Don't test it on an easy image. Test it on a nightmare image.
Here are the five criteria that actually matter.
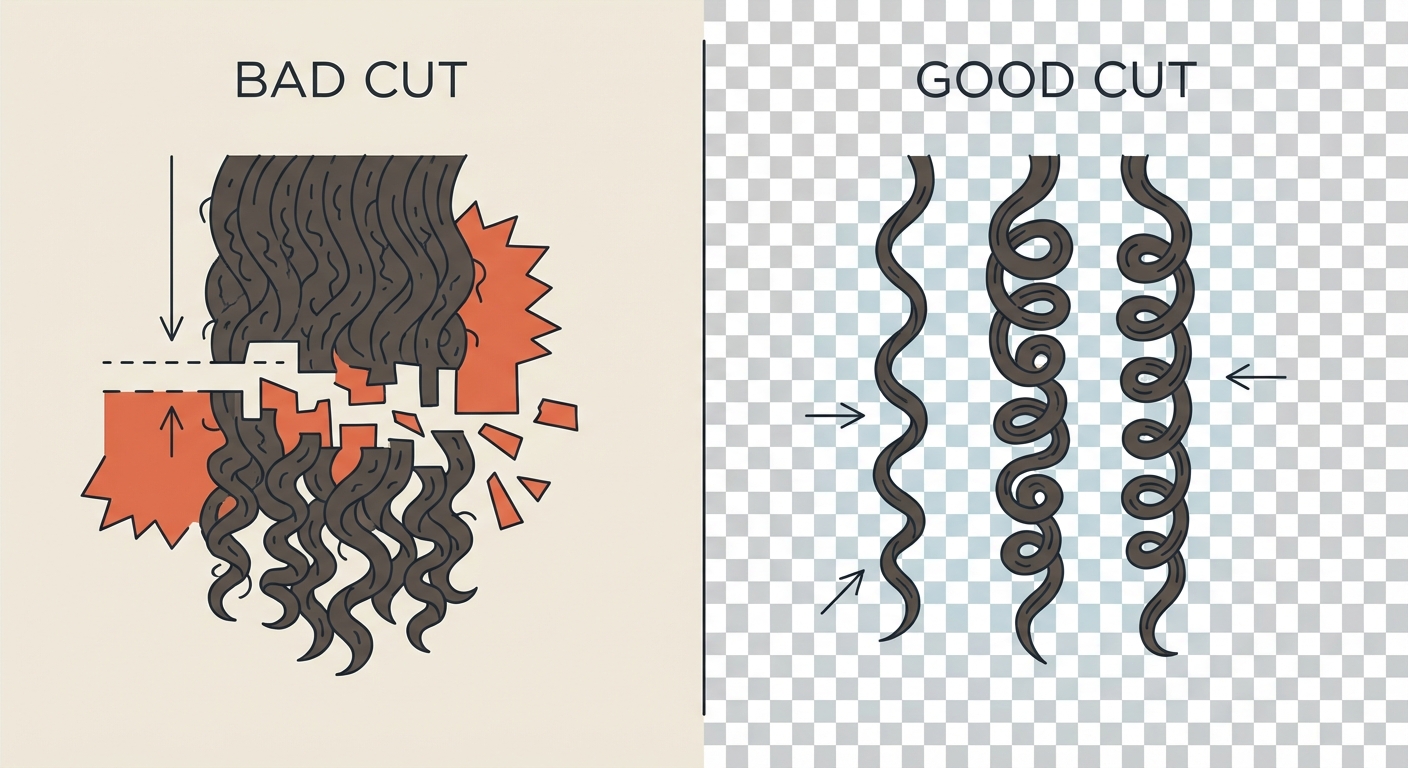
1. Edge Detection & Hair Masking (The "Frizz Test")
This is the ultimate litmus test. Upload a photo of a person with curly hair, or a Golden Retriever.
A mediocre tool will smooth the edges, giving the subject a "helmet hair" look. It cuts off the stray strands because it can't distinguish them from the background. A professional tool will preserve the translucency. It keeps the frizz. It understands that you should see the background through the hair, not just around it.
2. High-Resolution Export
This is where they get you. Many "free" tools compress your image down to standard HD (1920x1080) or even smaller.
That’s fine for a tweet. But if you need to print that image on a flyer, or use it for a full-width website banner on a 4K monitor, you are going to see pixels. Always check the maximum output resolution. If it doesn't support at least 4K or original file size export, walk away.
3. Batch Processing Capabilities
Time is the only asset you can't buy back. If you are processing more than ten images a week, look for a tool that supports bulk uploading. The ability to apply the same settings (like "add white background" or "add drop shadow") to fifty images at once can save you hours of mind-numbing manual work.
4. API Access
This is for the developers and the platform builders. If you are building an app where users upload profile pictures, you don't want a manual interface. You want an API.
An API allows your website to "talk" to the background remover automatically. The user uploads a selfie, your server sends it to the API, and the API sends back the cutout instantly. It makes your platform look incredibly high-tech with zero human intervention.
5. Manual Editor Functionality
AI is 99% accurate. That 1% will drive you insane.
Sometimes the tool mistakes a white shoe for a white floor. Sometimes it thinks a tripod leg is part of the model's leg. You need a built-in editor that allows you to manually "erase" or "restore" parts of the mask. If a tool gives you the result and no way to fix it, it’s a gamble, not a professional solution.
Step-by-Step: How to Ensure the Perfect Cutout
Here is a hard truth: Even the best AI can't fix a terrible input image. The quality of your cutout starts before you even open the software.
Phase 1: The Setup (Pre-processing)
Contrast is your best friend. If you are shooting a product, do not shoot a white item against a white wall. The AI will struggle to find the edge. It’s camouflage.
Shoot against a contrasting color. If the product is light, shoot on dark grey or green. If the product is dark, shoot on white. Also, watch your lighting. Heavy, hard shadows can confuse the algorithm into thinking the shadow is part of the object, resulting in a weird, lumpy cutout.
Phase 2: The Removal
Once uploaded, let the AI do the heavy lifting. But don't just hit export. Zoom in. Look at the tricky areas—hair, fur, glass, and shoelaces. Use the manual brush to touch up any missed spots. A human eye is still better than a machine eye for the final 1%.
Phase 3: The "Grounding" (Post-processing)
A raw cutout often looks "stuck on." It floats. It lacks depth.
To make it look realistic on a new background, you almost always need to add a subtle drop shadow. This "grounds" the object. It tells the viewer's brain that this object exists in 3D space. Just don't overdo it—a soft, directional shadow is all you need.

Common Pitfalls and Troubleshooting
Even with pro tools, things go wrong. Here are the two most common headaches and how to fix them.
The Translucency Trap: Things like clear water bottles, eyeglasses, or bridal veils are nightmares. They require semi-transparent pixels, not just solid ones. If your tool treats a glass bottle as a solid object, it will look fake on a new background because you can't see through it. You need a tool that supports "alpha transparency."
The Color Bleed (Spill): This is a physics problem. If you photograph a silver watch on a red table, the metal will reflect the red. The AI cuts out the watch, but when you put it on a white background, that red reflection remains. It looks like a stain.
To fix this, you need to "desaturate" the edges of your subject. In Photoshop or advanced editors, this is often called "decontaminating colors." It neutralizes the reflection so the object looks neutral.
For more on fixing these specific issues, read our advanced photo editing tips.
FAQ Section
1. Does removing the background lower image quality? It depends on the tool. Many free web-based tools compress the image to save bandwidth, resulting in pixelation. Professional-grade tools and paid subscriptions typically offer "HD" or "Full Resolution" exports that preserve the original quality of your photography.
2. What file format supports transparent backgrounds? You must save your image as a PNG or WebP. JPEGs do not support transparency; if you save a cutout as a JPEG, the transparent area will automatically turn solid white or black.
3. Can AI remove backgrounds from video? Yes, but it is computationally heavier. Tools like Unscreen or RunwayML specialize in video background removal (rotoscoping), though they often require more processing power and may have lower resolution limits than static image tools.
4. Is there a completely free background remover without limits? "Completely free" usually comes with a catch—either lower resolution, watermarks, or a credit limit. The only truly free, unlimited option is to use open-source software like GIMP and do the work manually, or use the limited free tiers of AI tools for one-off tasks.


